Reports
GSTR-1
The GSTR-1 Report in Octa GST allows users to export data of GSTR-1 returns that have been filed on the government GST portal. This export can be done at both the GSTIN level (for a specific registration) and the PAN level (for all GSTINs under the same PAN), making it easy to review and analyse the filed returns efficiently.
Step by Step Export the DATA of GSTR 1
Step-1 GSTR-1 Filing Dashboard
First, navigate to the Filing Dashboard in Octa GST. To do this
- Log in and Select Company: Log in to Octa GST, select the company you want to work with, and open it.
- Navigate to GSTR-1 Tab: Go to the GSTR-1 tab. This will open the GSTR-1 filing dashboard for all periods.
- Check Return Status: Hover your mouse over any period to see whether the return has been filed or if data is available or not.
- Filing Dashboard
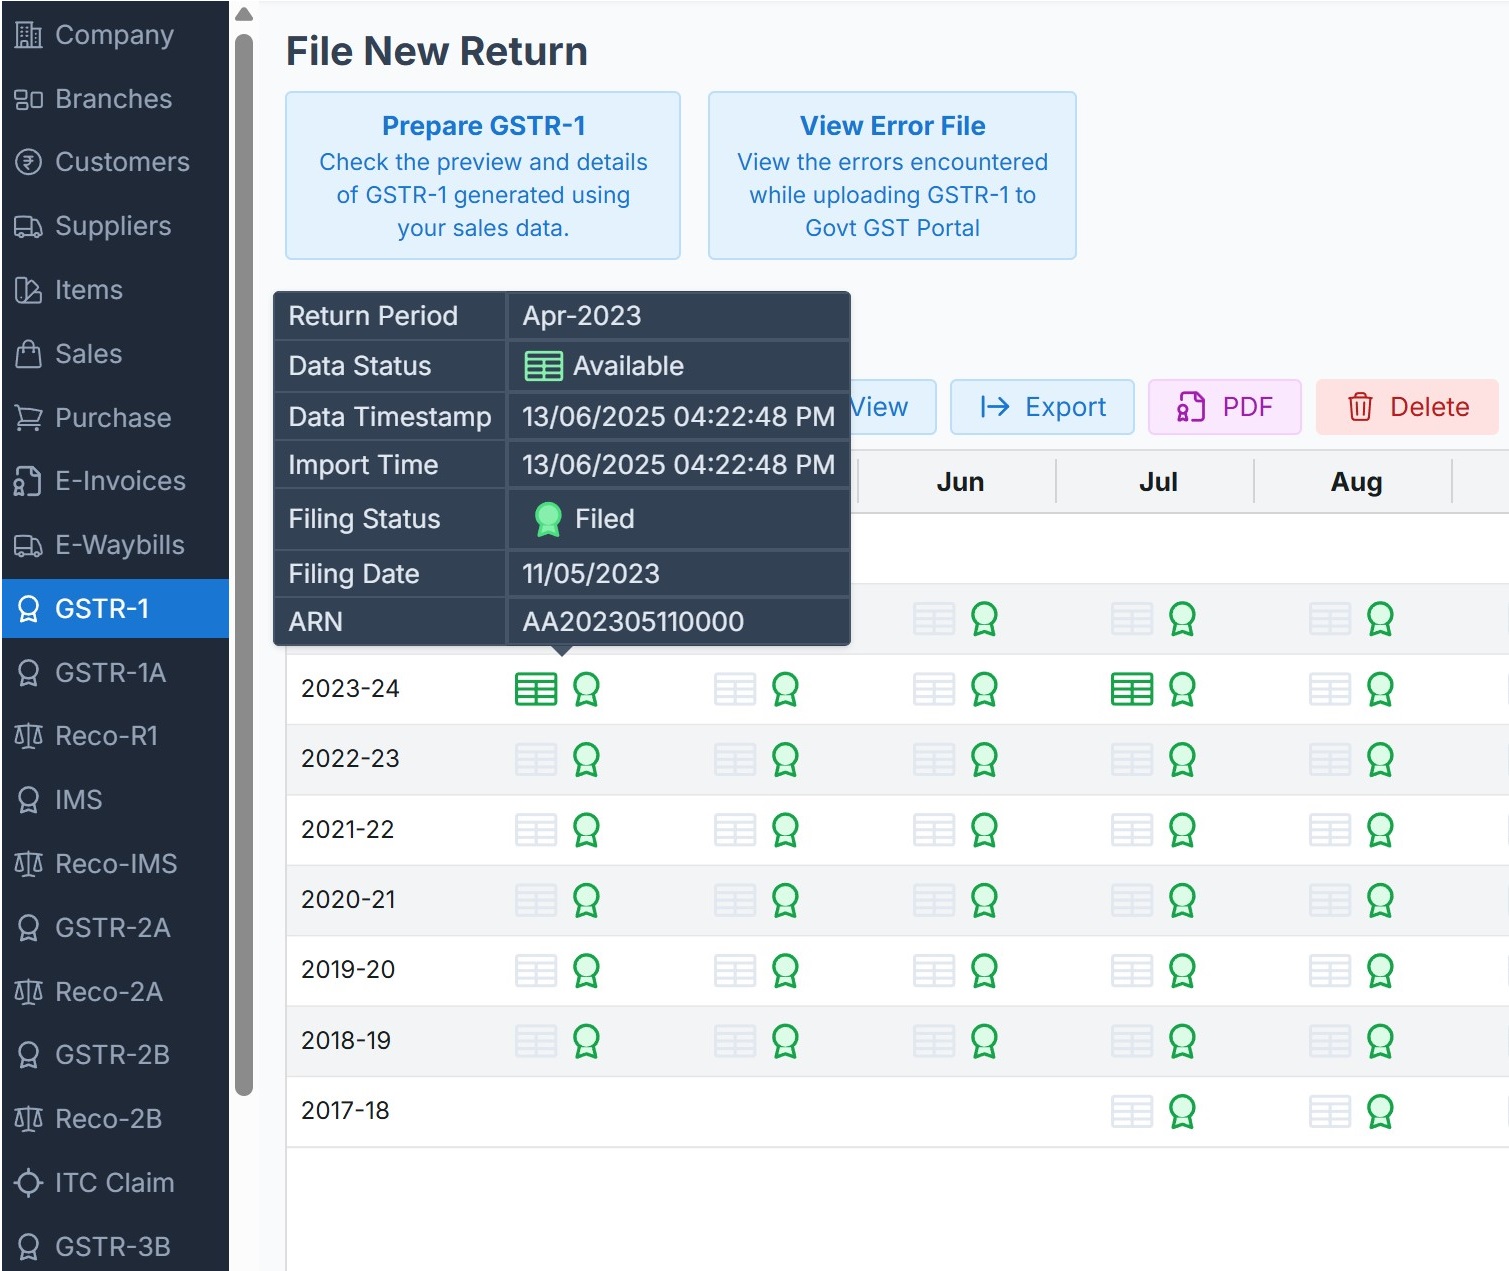 If the return has been filed and
you want to upload the data into Octa GST for exporting the data into Excel, the next step is to download the
JSON file, which will be used to import the data into Octa.
If the return has been filed and
you want to upload the data into Octa GST for exporting the data into Excel, the next step is to download the
JSON file, which will be used to import the data into Octa.
Step-2 Download JSON files
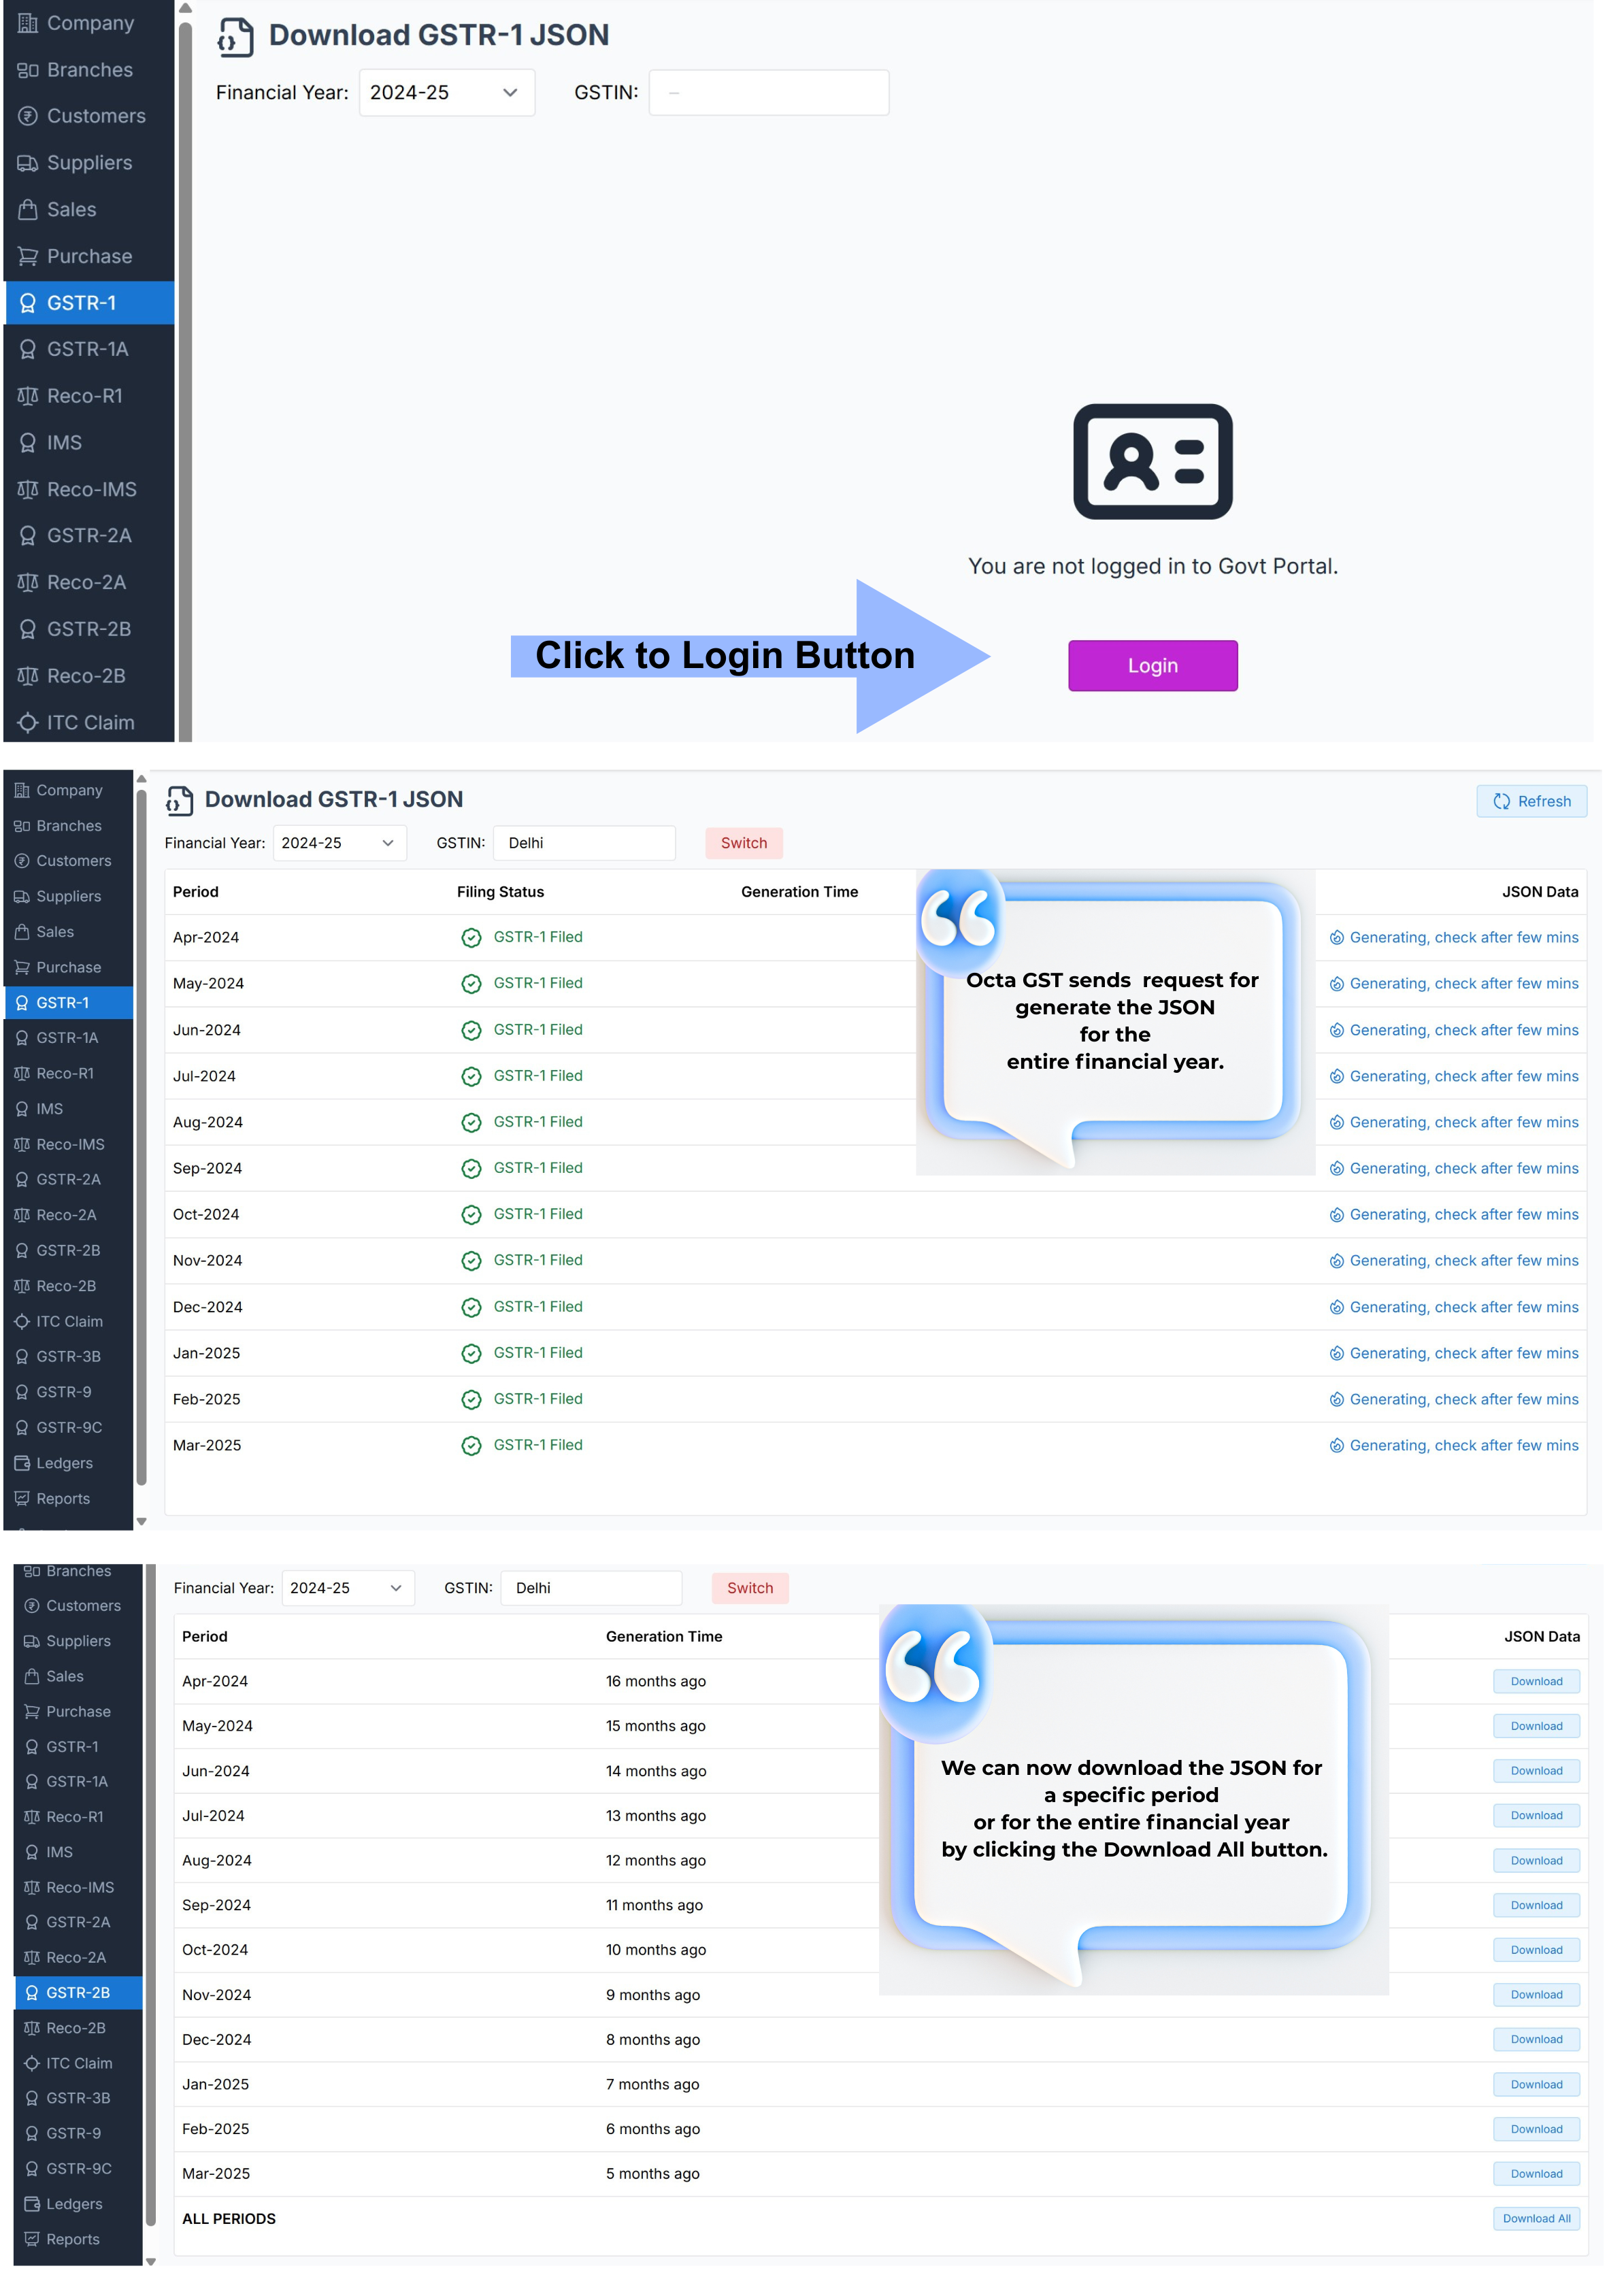
To download the JSON file follow the process
- Click the JSON Button: In the GSTR-1 dashboard, click the JSON button.
- Log In to the GST Portal: A login tab will open. Click the Login button and enter your GST Government Portal credentials (User ID and Password).
- Generate JSON: Once logged in, the screen for JSON generation will appear.
- Full-Year Download Option: Octa GST allows you to download the JSON file for the entire financial year. In this tab, Octa GST sends the generation request to the government portal.
- Refresh and Download: After a short time, once the JSON is generated, refresh the page. The Download option will appear. Click Download to save the JSON file.
Step-3 Adding JSON files
-
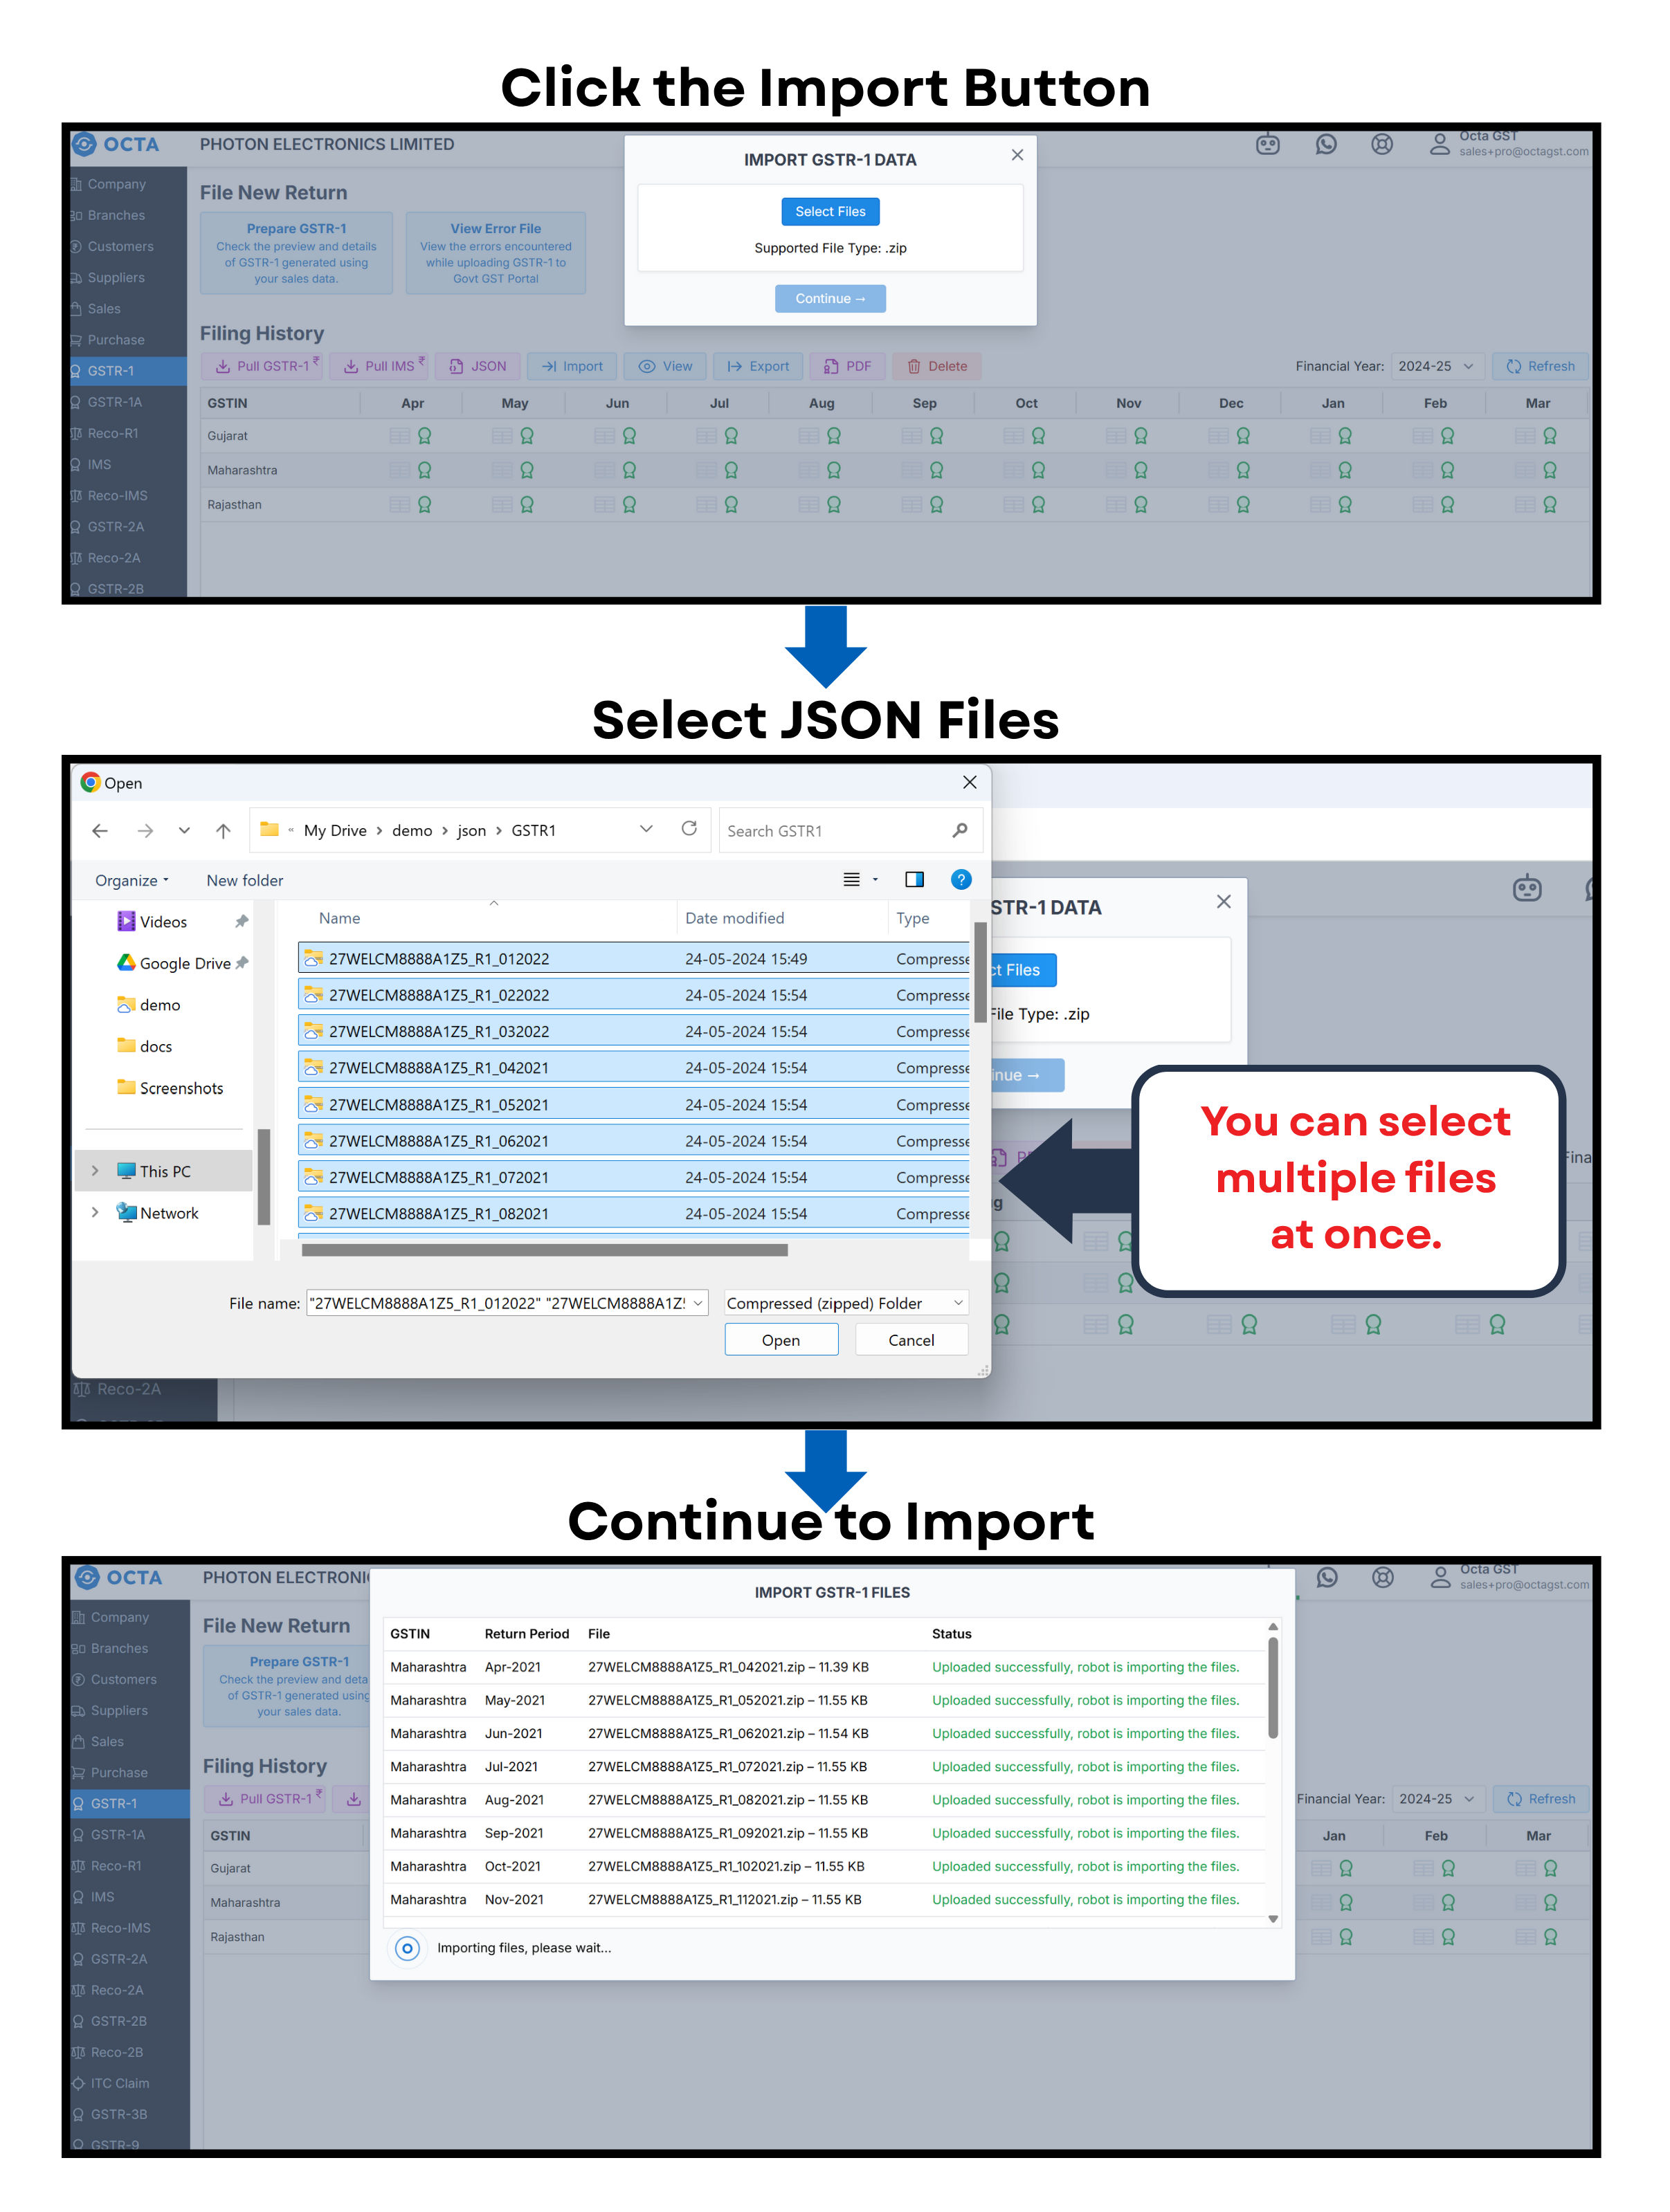
Go to the GSTR-1 Dashboard: In Octa GST, open the company and navigate to the GSTR-1 tab to access the dashboard.
-
Click the Import Button: On the dashboard, click the Import button.
-
Select JSON Files: Click Select, then browse your computer and choose the JSON file(s) you want to import.
-
Open the Files: After selecting, click Open to confirm your selection.
-
Continue to Import: Click the Continue button to start importing the data into Octa GST. To add data into Octa GST, go to the GSTR-1 dashboard and click the Import button. Then click Select and choose the JSON file(s) from your folder — multiple files can be selected at once. After selecting the file(s), click Open, and then click the Continue button to proceed with the import.
Pull data (using OTP)
Octa GST also provides a data pull option to fetch data directly from the government portal without using JSON. To use this feature, Octa GST must first be connected to the GST portal. To pull data, click the Pull button, select the desired period, and then click Continue. The system will retrieve data from the government portal for that period.
Step-4 Export GSTR-1
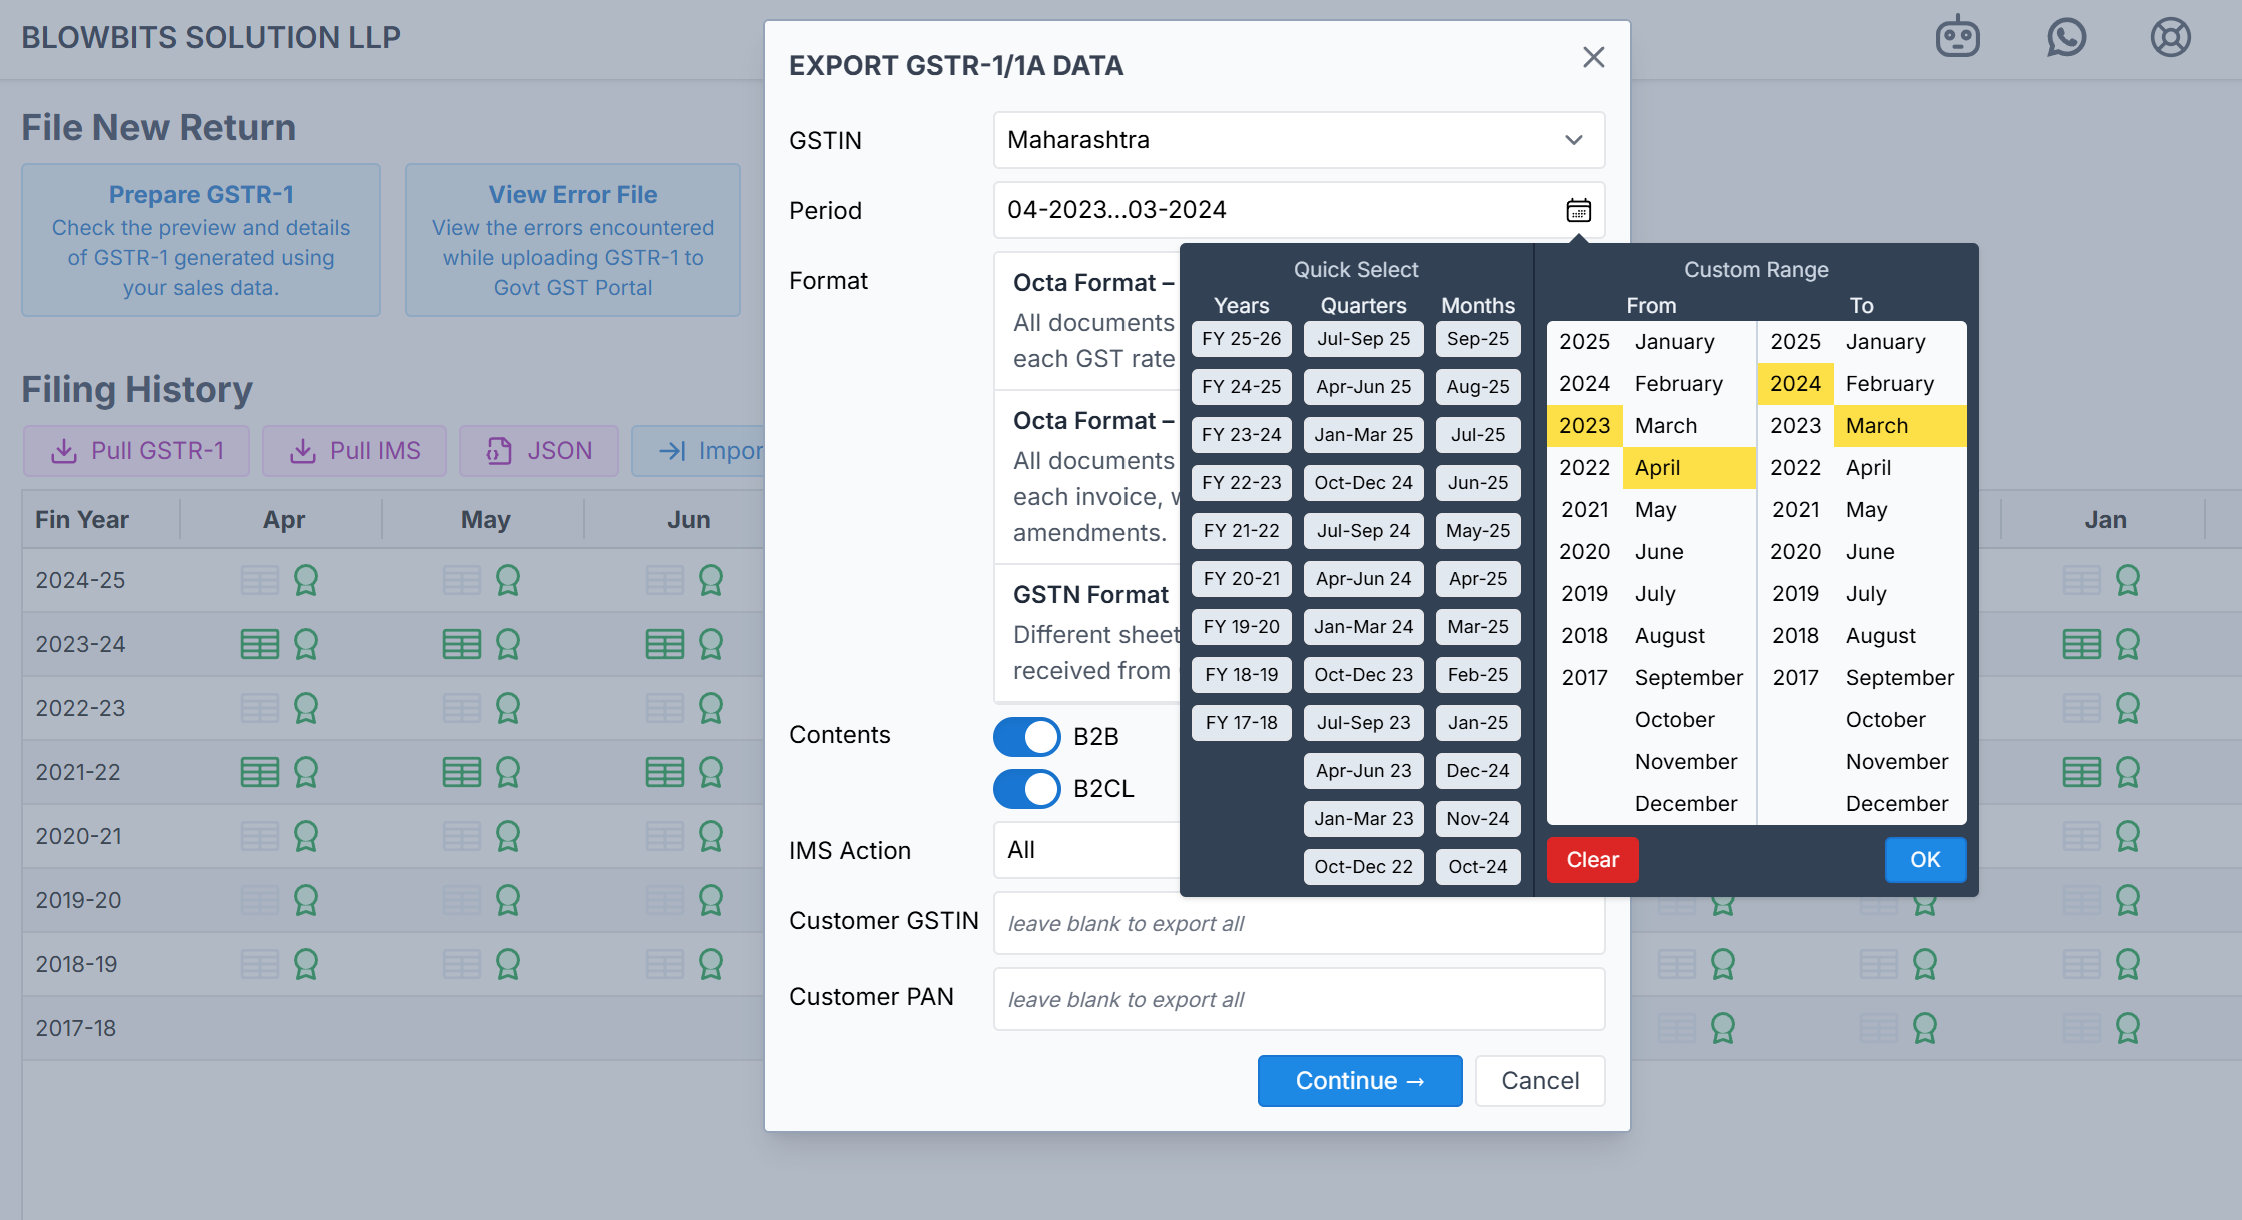
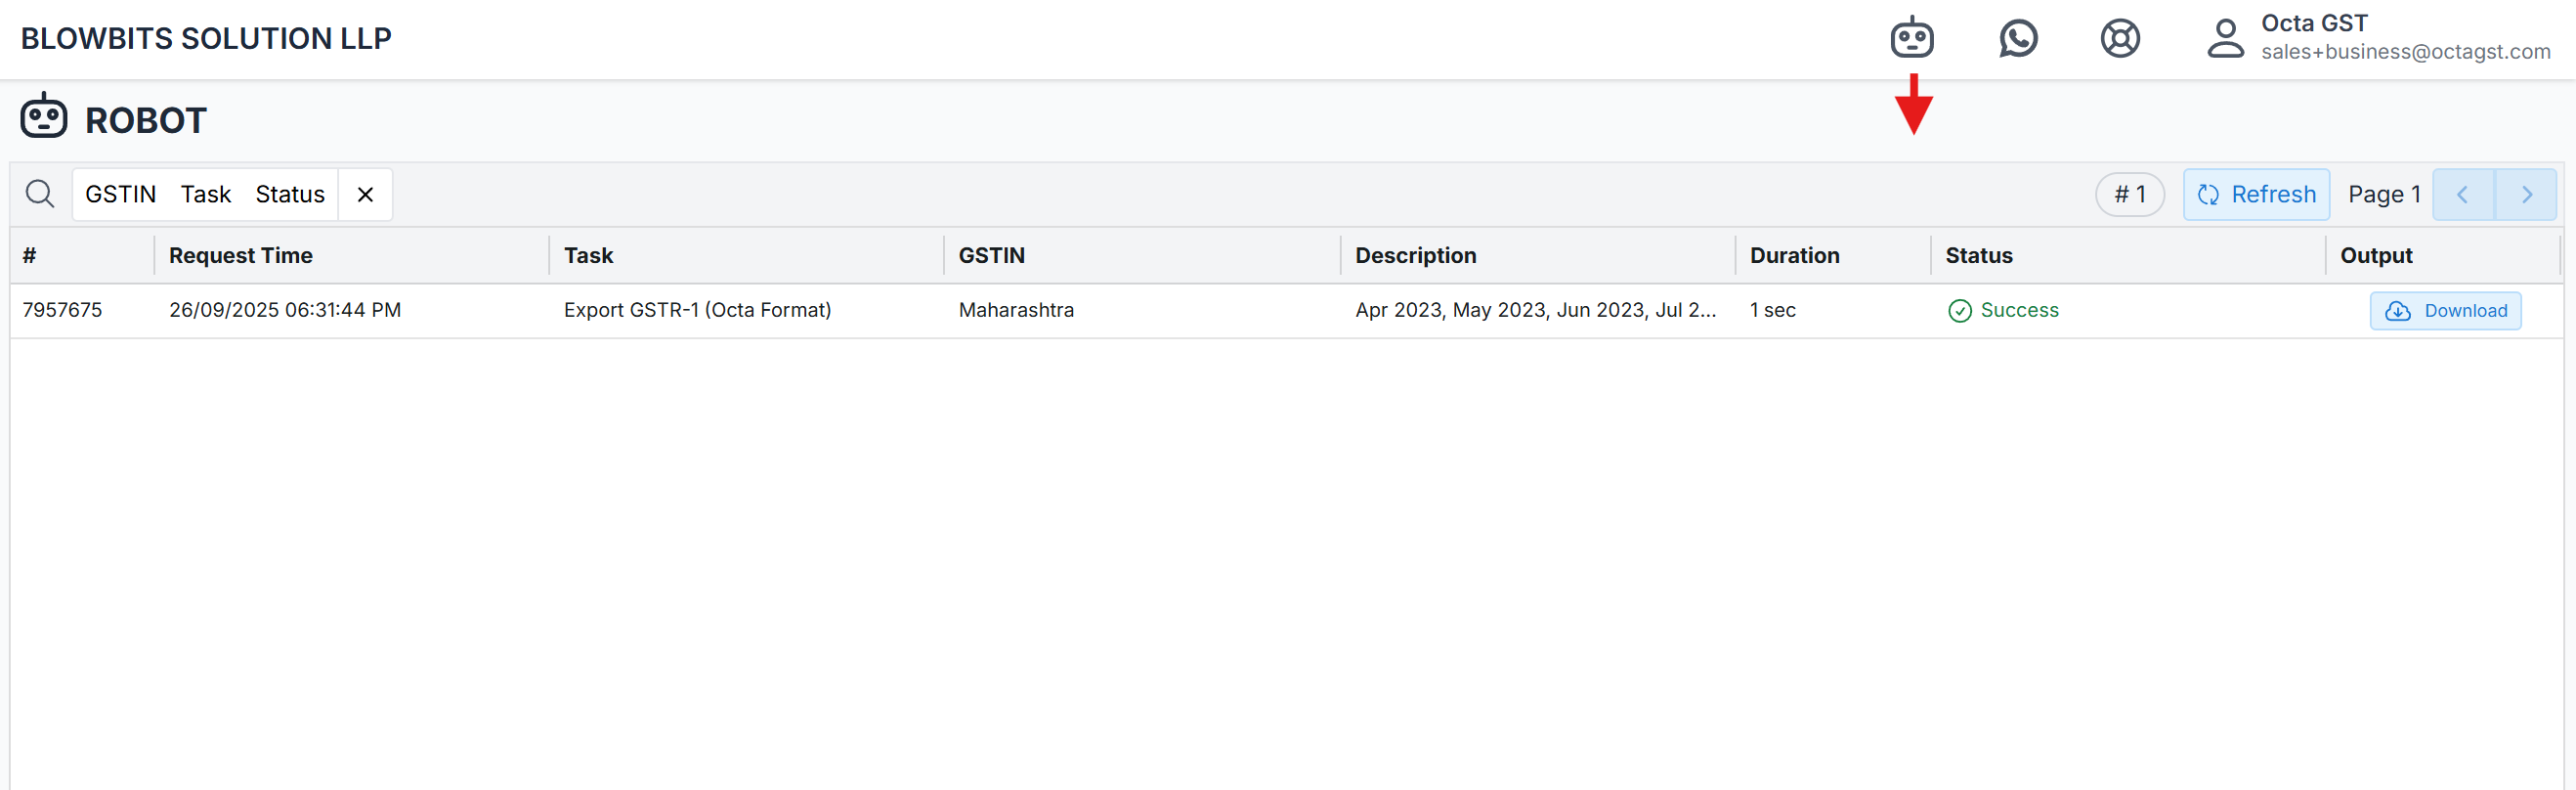
After uploading JSON into Octa GST or Pull Data, we can export it in Excel format. To do this, simply click the Export button, select the desired period, and click Continue. The file will be generated in the Robot tab, from where we can download the Excel file containing the data.
When we click on the Export button, the export window opens, showing the download formats. Octa GST provides GSTR-1 Data in three type of format:
-
Octa Full Format – In the Octa Full Format, each invoice can contain multiple line items, and all these line items are displayed separately in the export. This ensures a detailed view of every transaction, making it ideal for thorough analysis and record-keeping.
-
Octa Smart Format – Consolidates invoice-level entries into a single Excel file.
-
Government Portal Format – Reflects the government portal structure, with multiple sheets for every section of the return.
 Download Report from Robot
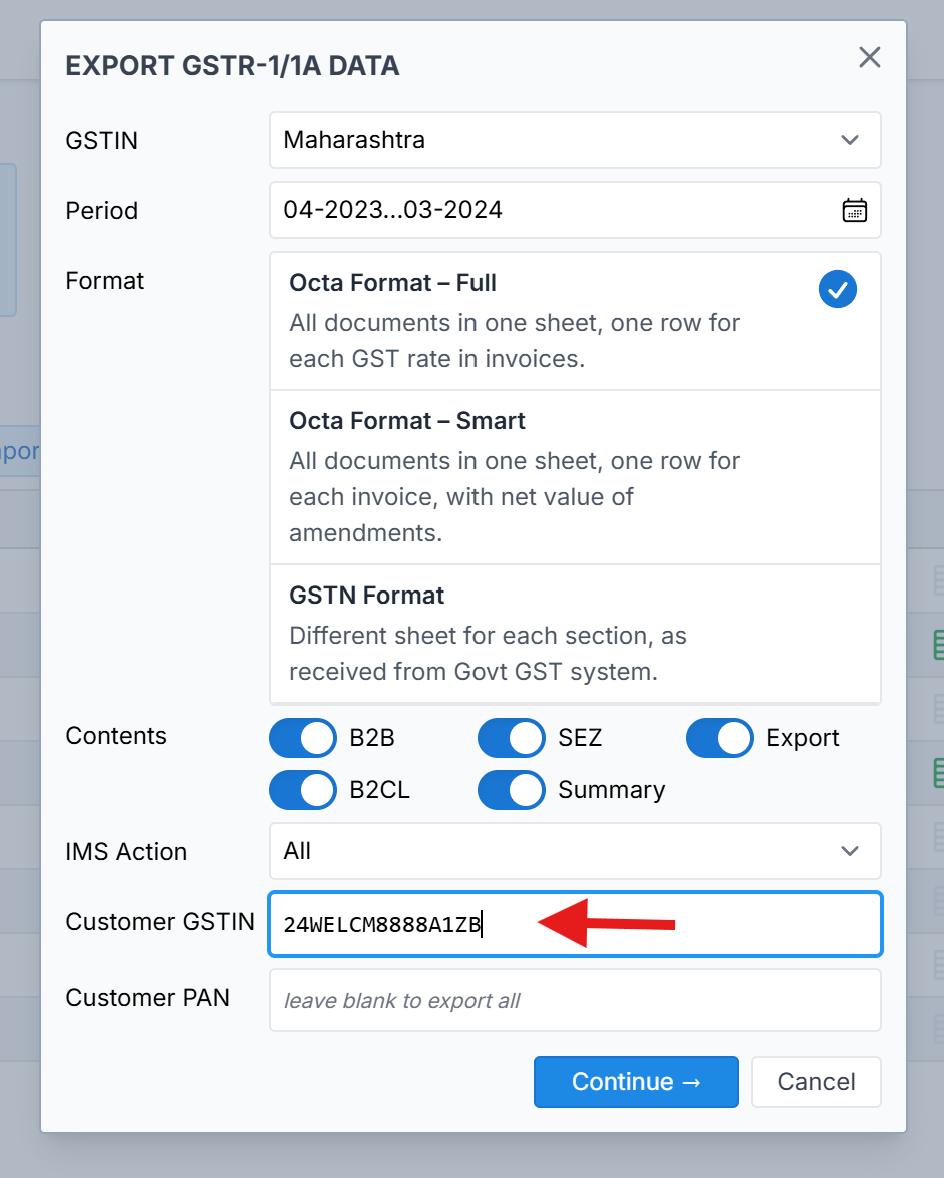
Export specific GSTIN and PAN Data
In Octa GST, if you want to export data for a specific customer, you can do so using the GSTIN or PAN of the
client. When we click the Export button, the export window opens, and there is an option to enter the customer’s GSTIN
or PAN. By providing this information, you can generate and export data specifically for that customer.
Outward IMS
In Octa GST, there is a provision to download the Outward IMS data at the invoice level for a selected return period, specifically focusing on those documents that have resulted in an increase in tax liability in GSTR-3B.
This means that the system provides only the relevant invoices or documents due to which the liability in GSTR-3B has increased when compared with the data reported in GSTR-1. By exporting the data for a particular period, you can obtain detailed invoice-level information that clearly identifies the transactions responsible for the additional liability reflected in GSTR-3B.
In essence, this report acts as a liability difference statement between GSTR-1 and GSTR-3B, enabling users to trace and reconcile the exact documents that have contributed to the variance in tax liability for the respective tax period. This provides better visibility into customer interactions and enables timely follow-ups or necessary corrections whenever required.
How to Get Outward IMS Data in Octa GST
Step 1: Open the Outward IMS Dashboard
Log in to Octa GST, select the relevant company, and navigate to the Outward IMS tab. This will open the Outward IMS dashboard, where data for all return periods is available.
Step 2: Pull Outward IMS Data
Pull IMS button to fetch the Outward IMS data directly from the government portal for the selected return period. Ensure the data is successfully updated before proceeding.
Step 3: Export the Outward IMS Report
After pulling the IMS data, go to the Dashboard and click the Export button. Select the required return period and click Continue. The system will generate an Excel file for the selected period.
Step 4: Download the File from the Robot Tab
Navigate to the Robot tab and download the generated Excel file.