Filing GSTR-1
Prepare GSTR-1
GSTR-1 Preview
Previewing GSTR-1 means checking the data you have uploaded in the Sales tab before filing the return. To preview GSTR-1, click on the GSTR-1 tab, then click Prepare GSTR-1 and select the period. This will display a detailed view of the uploaded data in GSTR-1 format, allowing you to review it before submission. In the preview tab, you can verify whether B2B transactions, B2C summary, and the HSN summary or other details are accurate. For section-wise verification of the uploaded data in Excel format, click the Export button to download the data on upper right side on prepare GSTR-1 dashboard.
- Note - The Preview of GSTR-1 is allow one tax period of one GSTIN at a time. You can change the period or GSTIN to preview another return.
Comparison of Auto-Populated Data from E-invoices
If you have e-invoicing and the data is auto-populated on GST government portal from the e-invoicing system, you may want to reconcile your books data with the e-invoicing auto-populated data on the portal. For this, Octa GST provides the Portal Reconciliation button in the Prepare GSTR-1 Dashboard. To use it, enable the option located at the left-side corner of the Prepare GSTR-1 dashboard, and the Portal Reconciliation feature will activated.
Step-1 Enable Portal Reco
To enable the Portal Reconciliation feature in Octa GST, go to the Prepare GSTR-1 Dashboard and click on the Portal Reco button located at the left corner of the screen. This action activates the Portal Reconciliation option. For reconciliation to work properly, it is essential that both your sales data and the GST government portal data are available in Octa GST. If your sales data is already uploaded but the government portal data is not, you must upload the portal data first. The process of uploading portal data is the same as uploading filed GSTR-1 data into Octa GST (follow step-2).
Step-2 Filing Dashboard
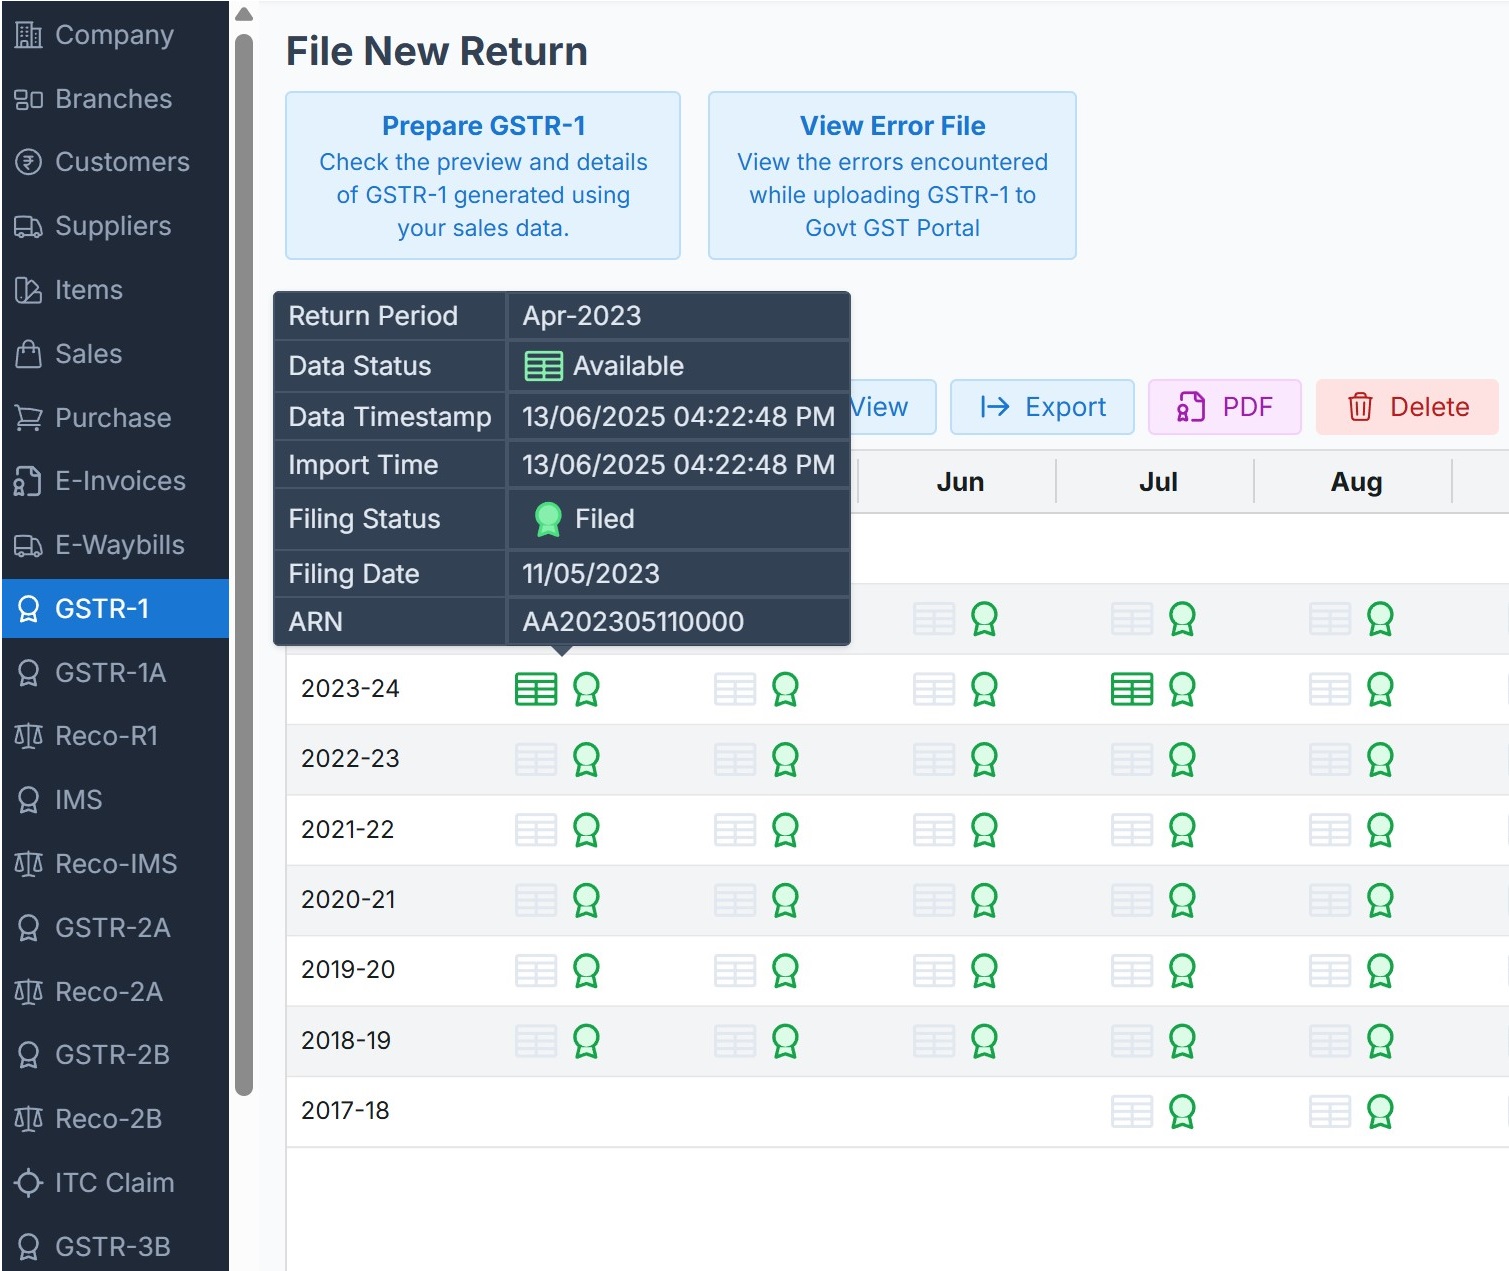
First, navigate to the Filing Dashboard in Octa GST. To do this, go to the GSTR-1 tab; this will open the GSTR-1 filing dashboard for all periods. In the dashboard, when you move your mouse over any period, you can see whether the return has been filed or if data is available or not .to upload the data in the next step is to download the JSON file (covered in the next step).
- Filing Dashboard
Step-3 Download JSON files
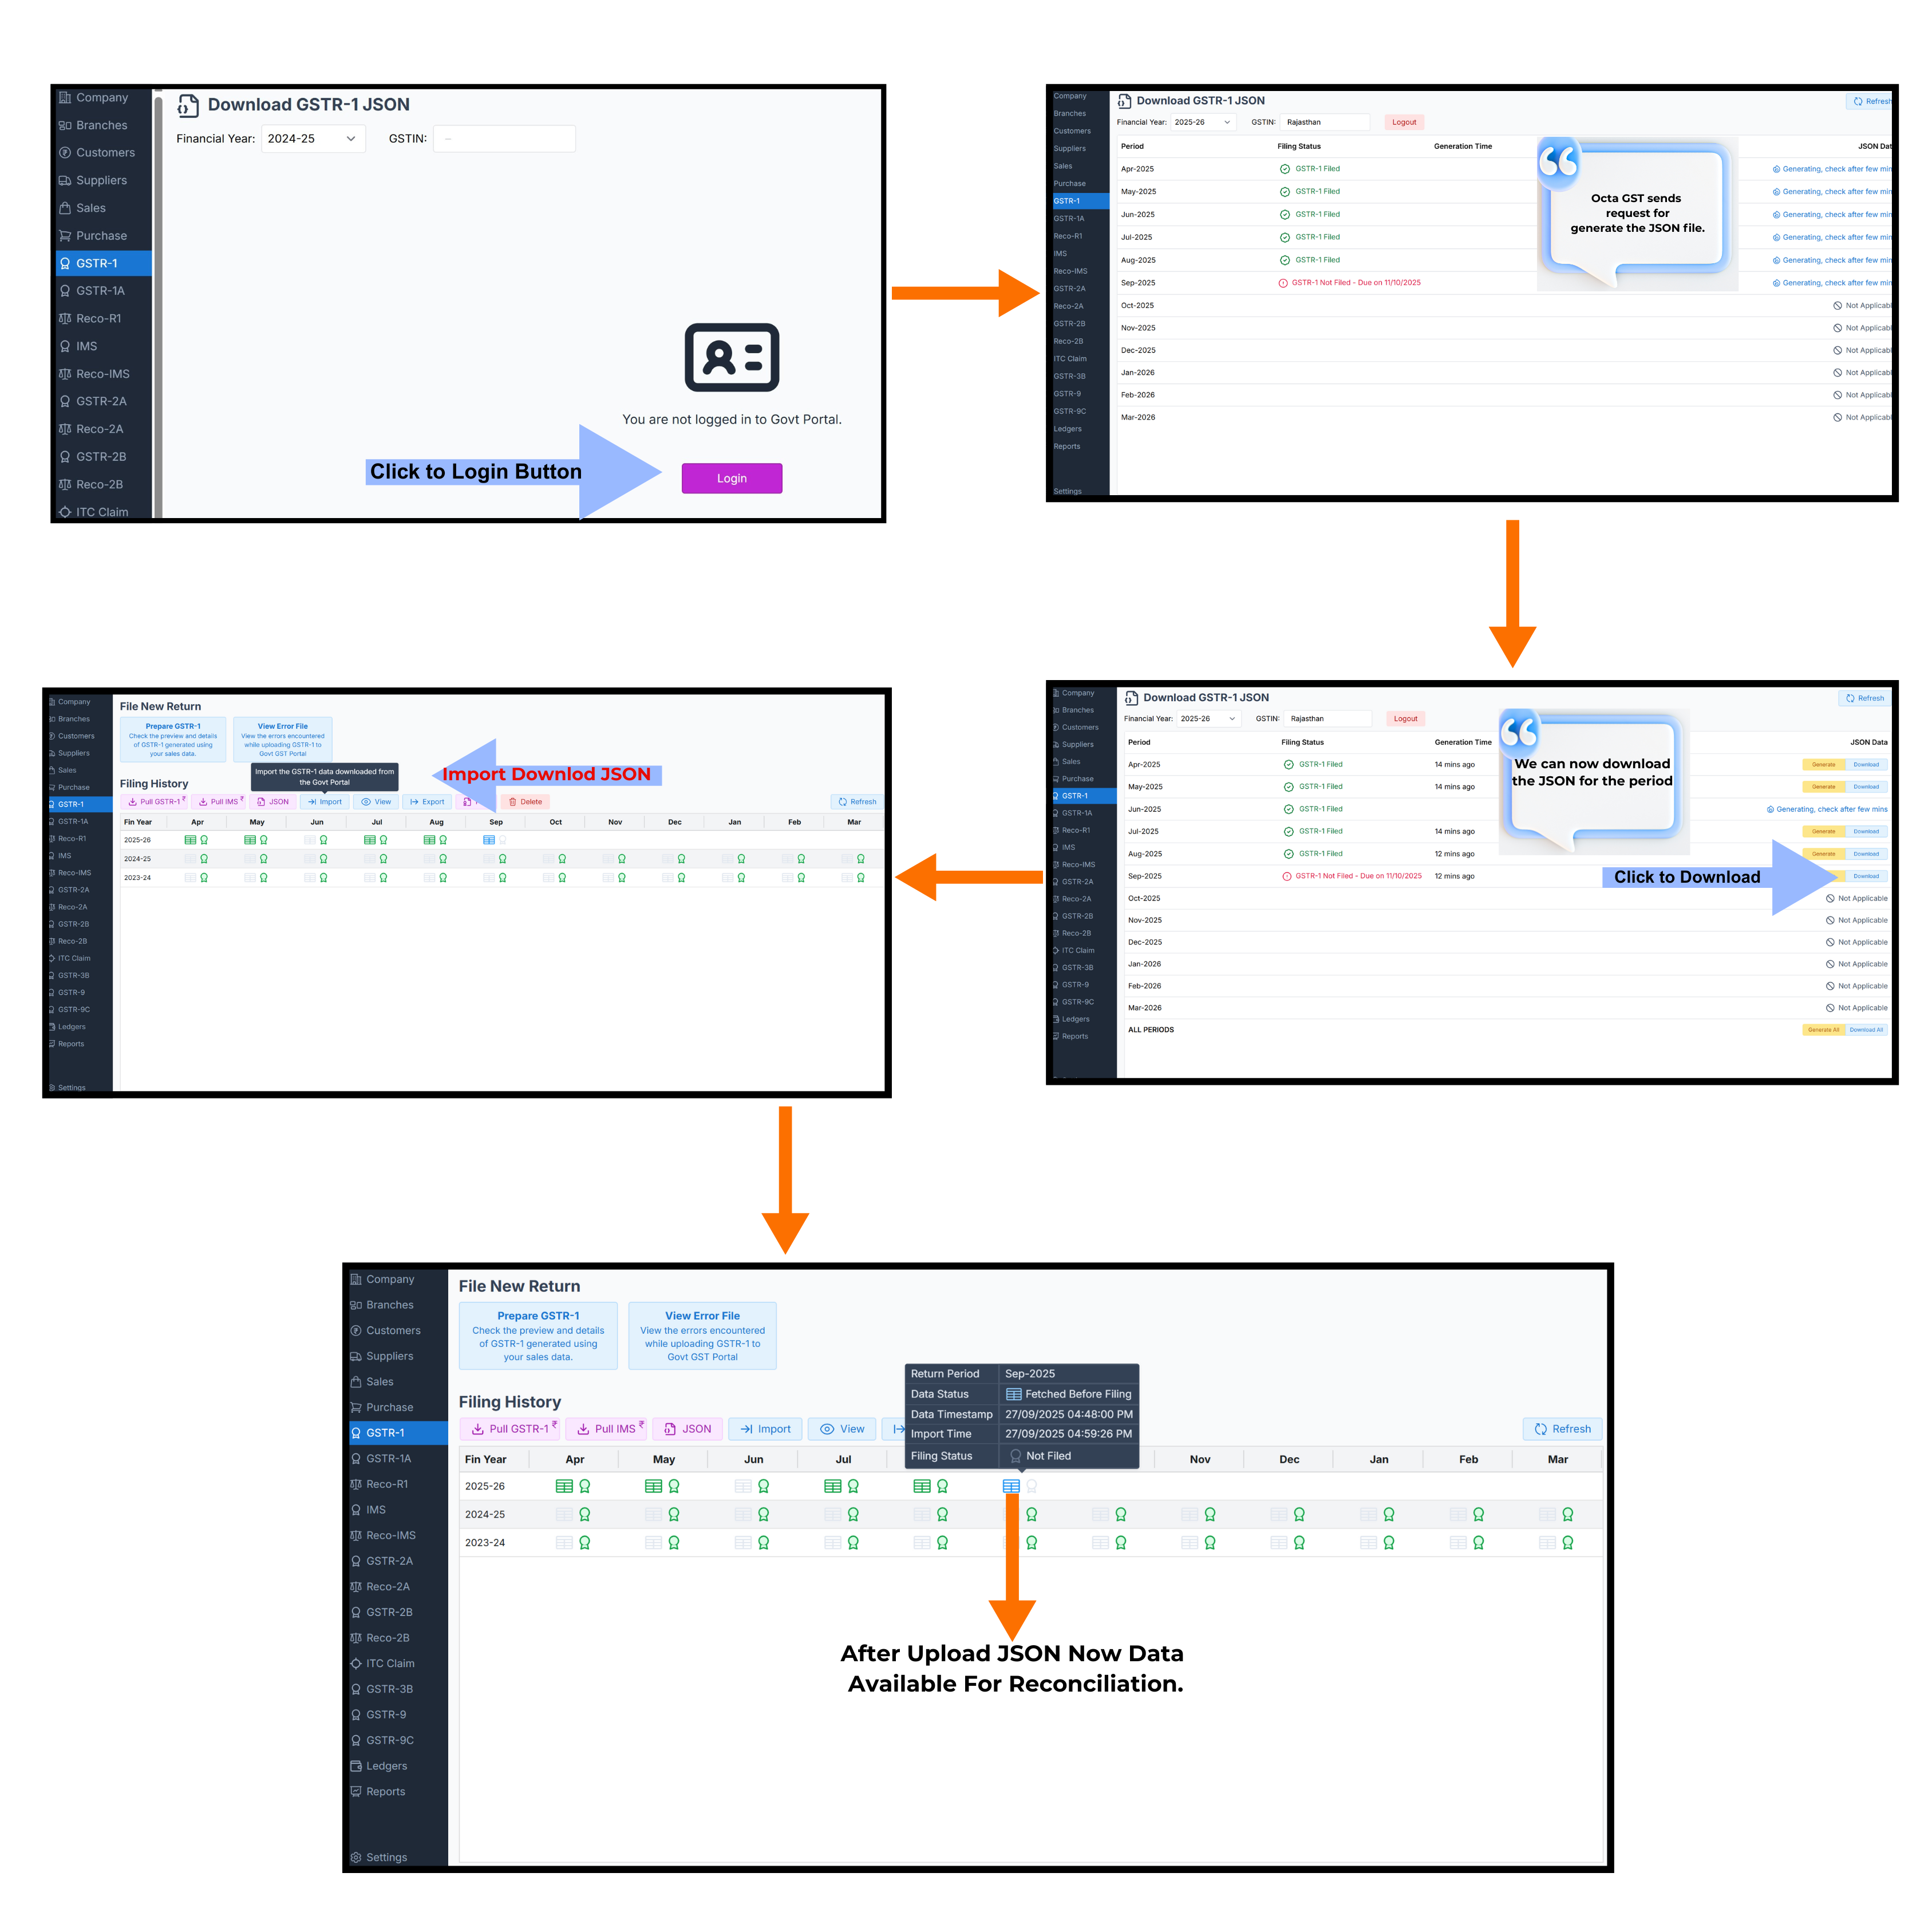
To download the JSON file in the GSTR-1 dashboard, click the JSON button. A login tab will open, where you need to click the Login button and enter your GST government portal credentials (ID and password). Once logged in, the screen for JSON generation will appear. Octa GST provides the facility to download the JSON file for the entire financial year, and in this tab, Octa GST sends the generation request to the government portal. After a short time, once the JSON is generated, refresh the page, and you will see the Download option to save the JSON file.
Step-4 Adding JSON files
To add data into Octa GST, go to the GSTR-1 dashboard and click the Import button. Then click Select and choose the JSON file(s) from your folder — multiple files can be selected at once. After selecting the file(s), click Open, and then click the Continue button to proceed with the import.
Pull data (using OTP)
For better and faster connectivity and to increase efficiency, Octa GST provides direct connectivity with the government portal, allowing data to be pulled using OTP authentication. When the Portal Reco button is enabled, a Pull button appears on the right side of the dashboard. By clicking the Pull button, Octa GST fetches the data directly from the government portal, eliminating the need for the traditional JSON download and upload process.
Step-5 Reconcile Sale Data
Now we have uploaded both the data ( Sales data from books and portal auto-populate data) and for reconciliation we have to nevigate to prepare GSTR-1 Dashboard. and in dashboard the Portal Reco is enabled. now we have to click to Reconcile Button on right side of the dashboard. and reconciliation will done by system and now refresh the the page. now we can see
-
Match - Match indicates that a sales document is fully aligned with its corresponding Portal entry. This means the document is completely identified, and all details—such as invoice number, date, taxable value, and customer details—exactly correspond between the Sales Register and Portal data. When a document is fully matched, there are no discrepancies, ensuring the record is accurate and verified.
-
Almost Match - Almost Match, also called smart matching, occurs when a sales document and the corresponding Portal entry are exactly identical but Minor differences—such as rounding off amounts, small discrepancies in invoice details, or variations in entry formats—may trigger this. The smart matching feature helps identify these near matches, allowing taxpayers to quickly verify and reconcile documents without manually checking each small discrepancy.
-
Mismatch - Mismatch means that a sales document does not match the corresponding Portal document. This indicates that the system could not find proper alignment between the invoice in the Sales Register and its corresponding Portal entry.
-
Missing in Portal - Missing in Portal (shown in orange) indicates that a sales document exists in the Sales Register but does not have a corresponding entry in the Portal. This means the invoice has been recorded in the books but is not reflected in the government portal data.
-
Missing in Sales - Missing in Sales Register (shown in purple) indicates that a Portal document exists in the government portal but does not have a corresponding entry in the Sales Register. This means the invoice is recorded in the Portal but is absent in the books of the taxpayer.
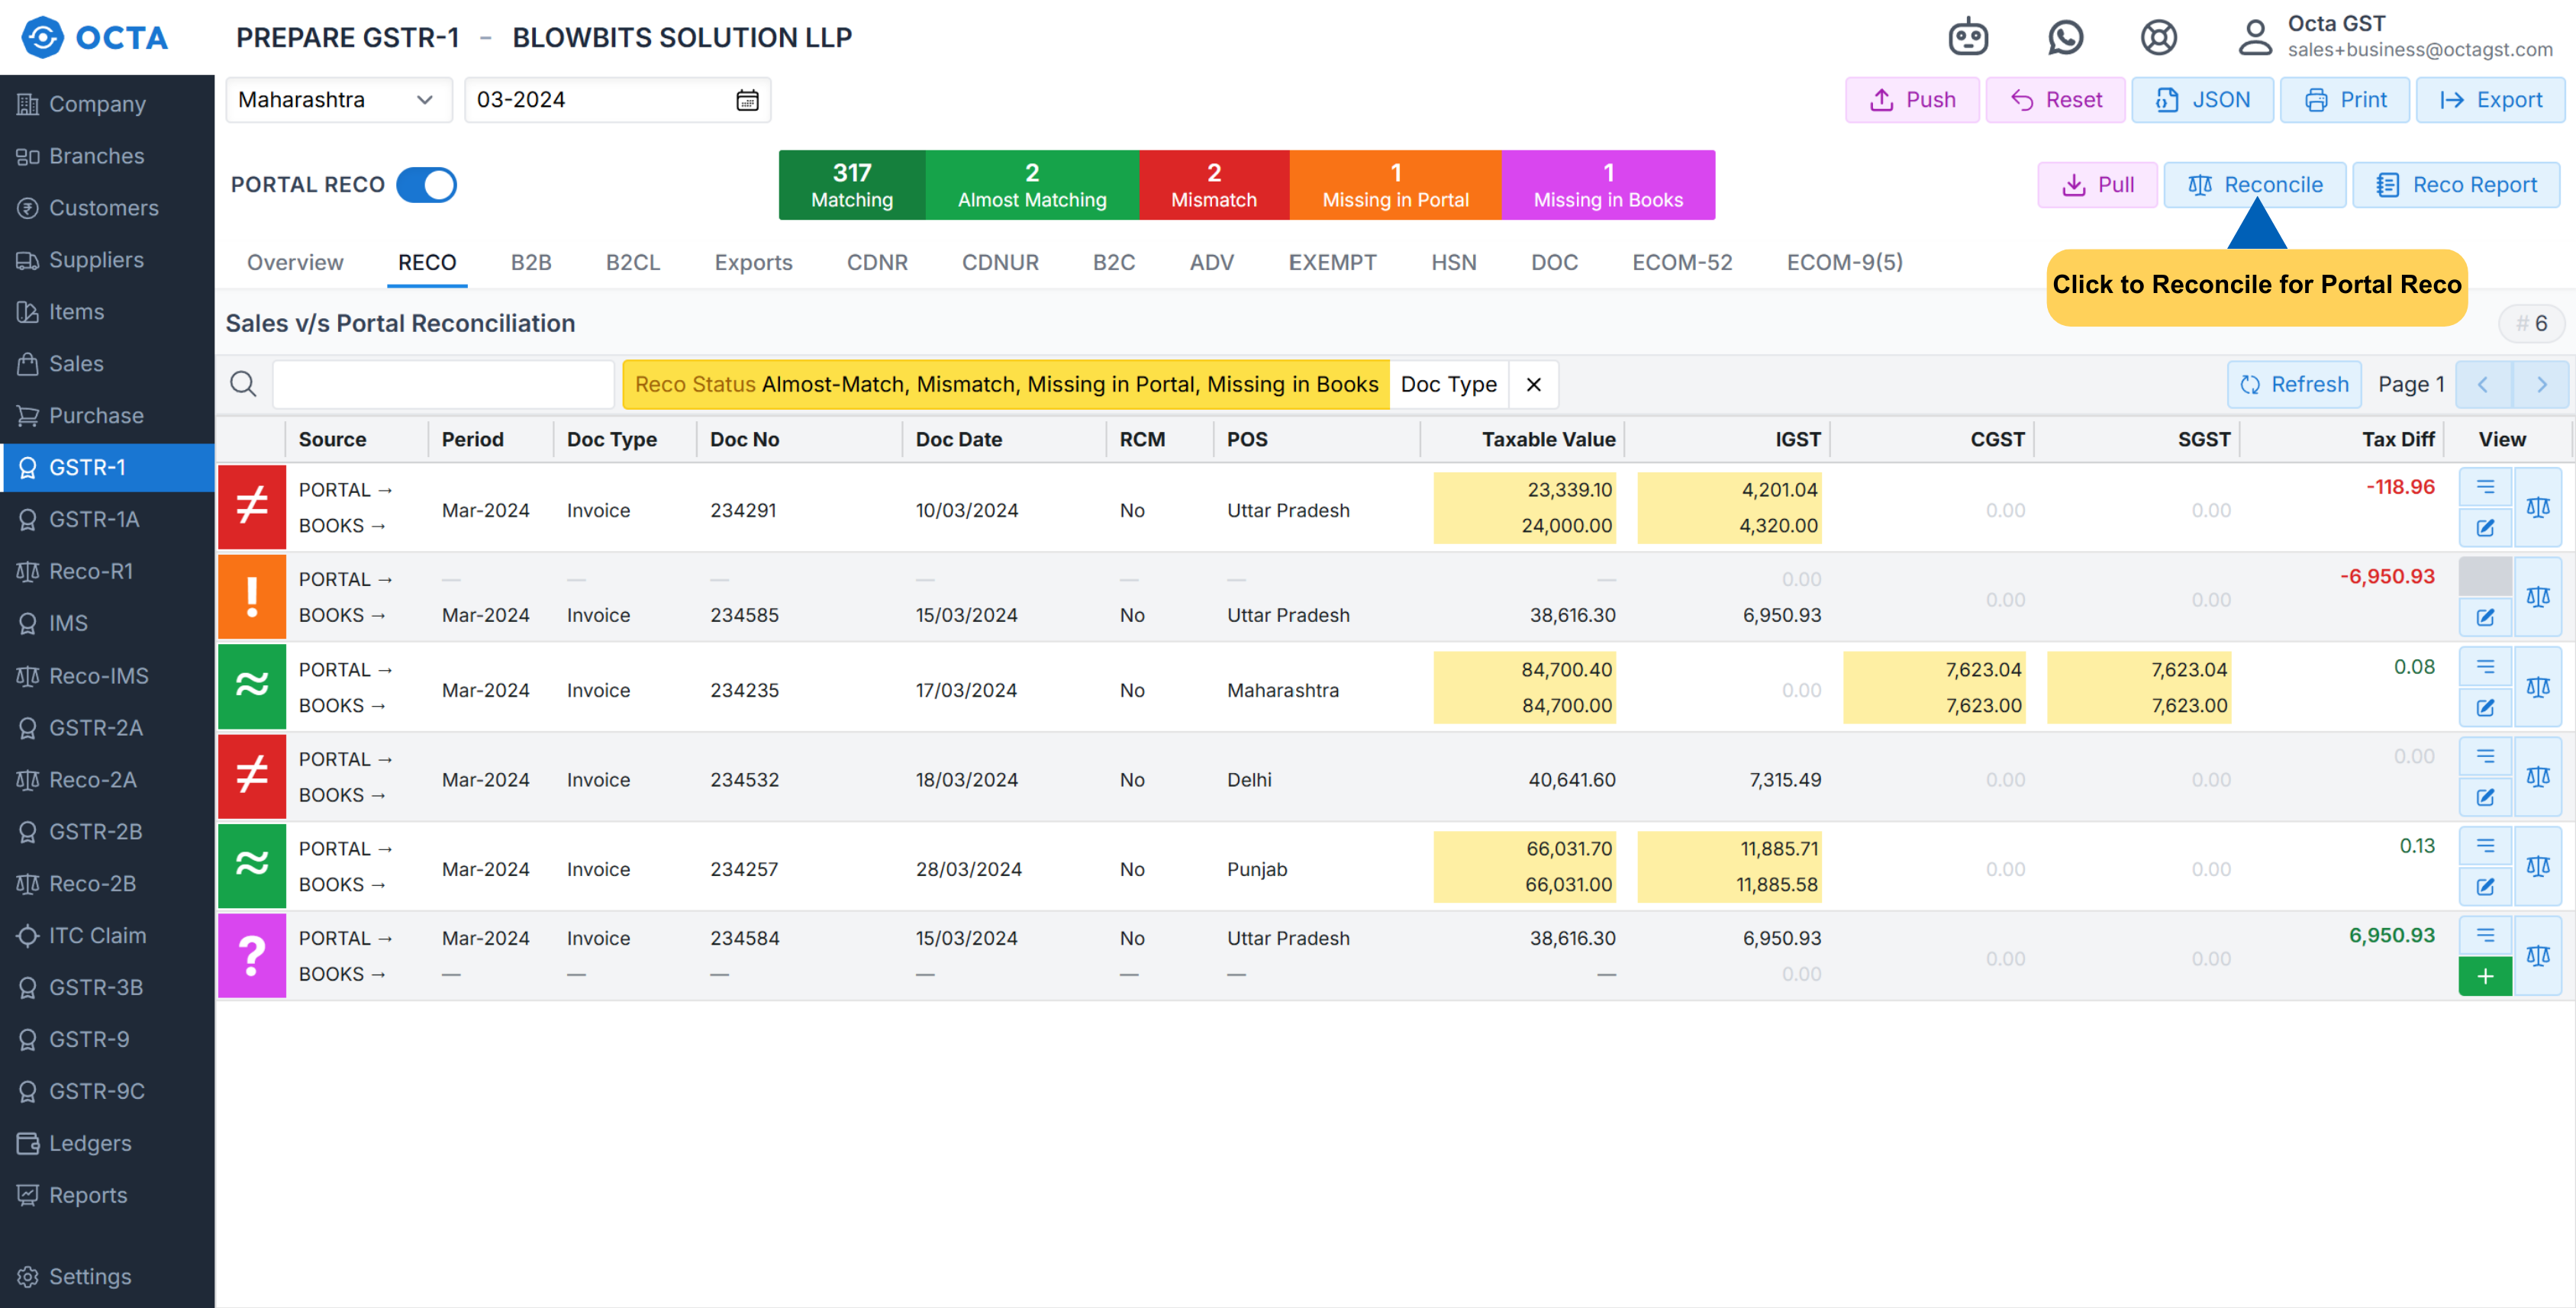
You can also export the comparison in Excel by clicking on the Reco Report button. Once generated, the report will be available in the Robot tab, where you can download it for further analysis.
Alter the Books Data According to Govt portal data
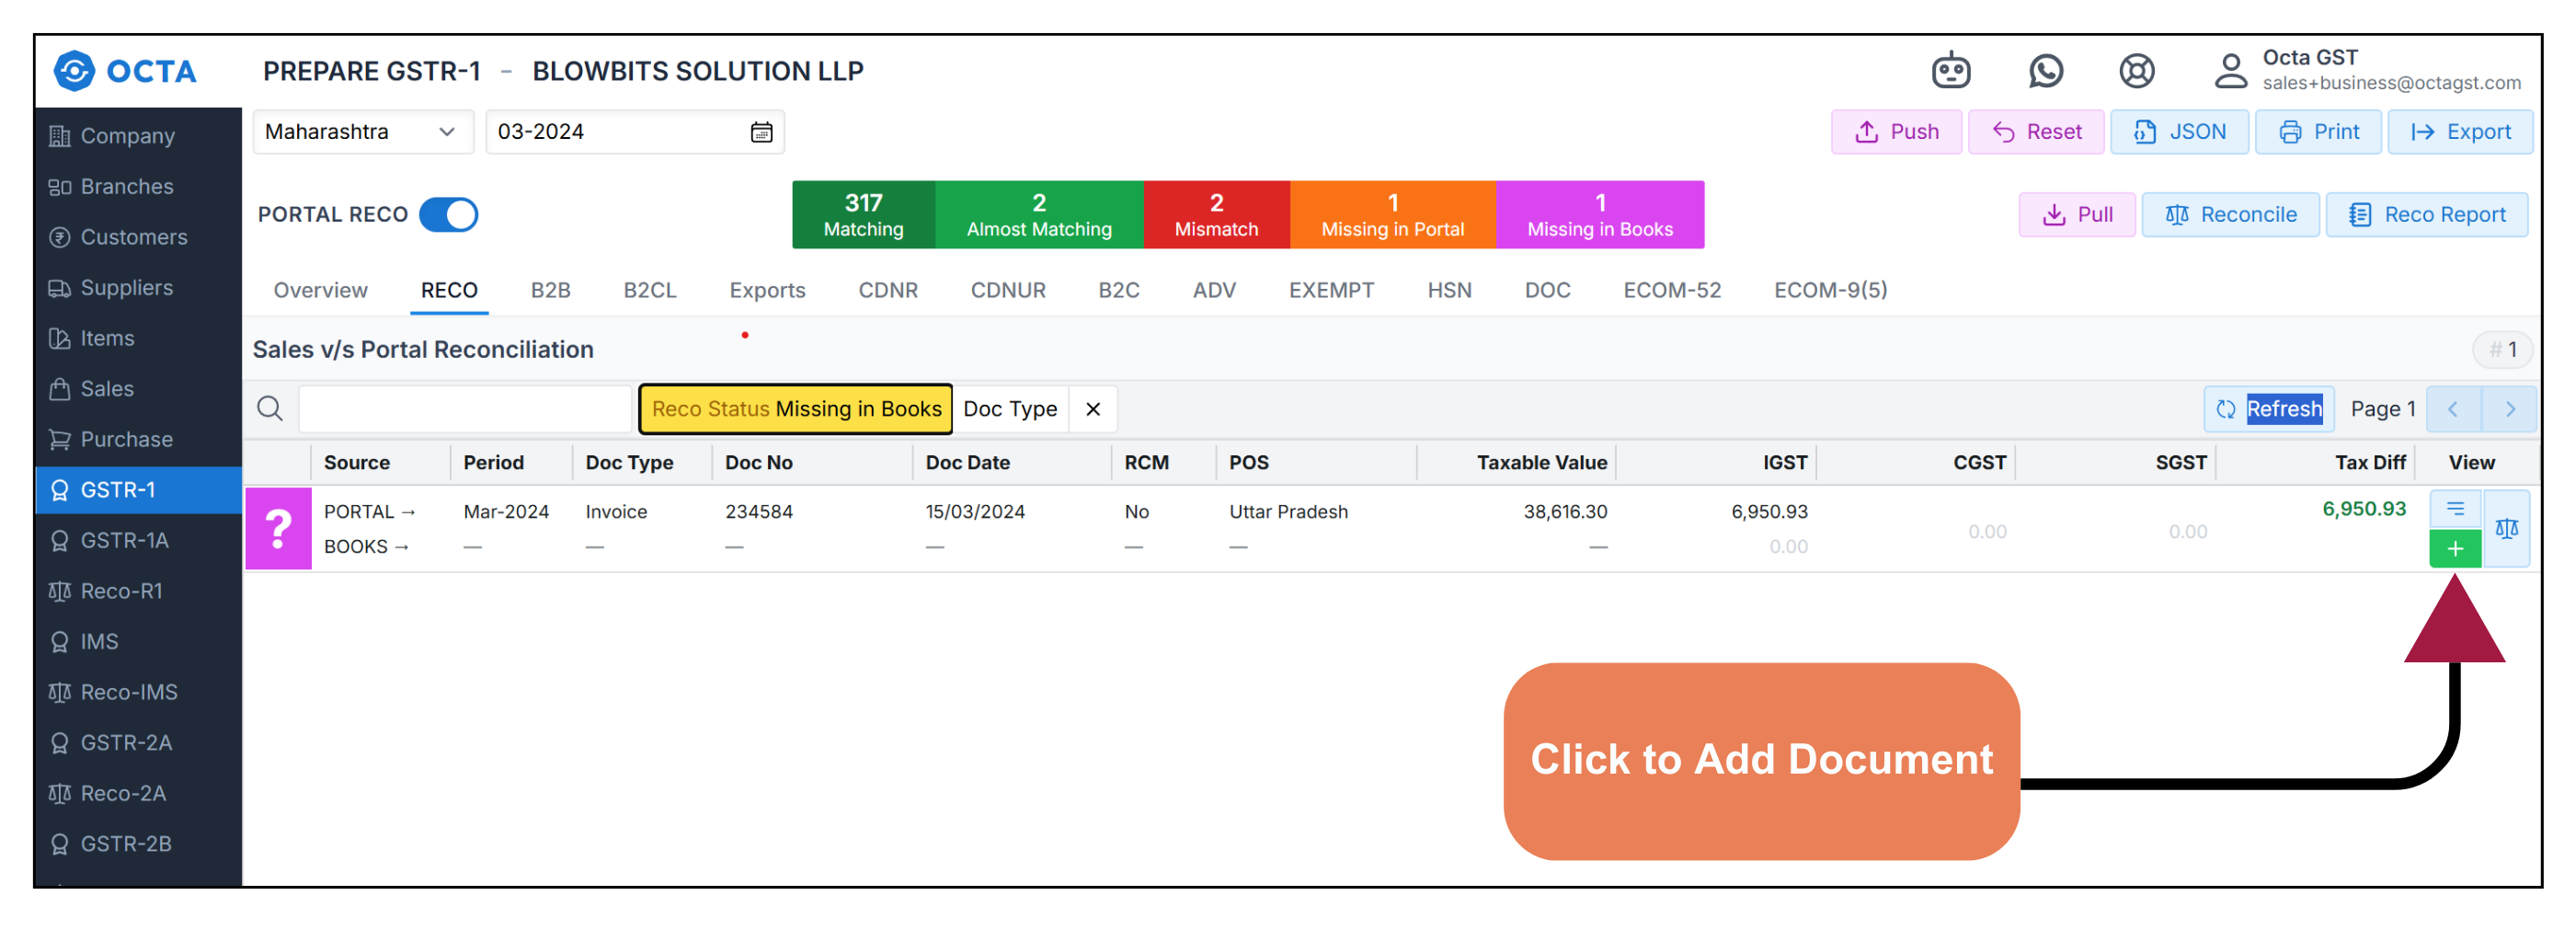
After completing the reconciliation, we focus on Mismatch and Missing in Books records - documents that are either not matched or not available in the books. Upon verification, if you found the data appearing in the Portal is correct and you want to update the books data uploaded in Octa GST, the system provides a Reco tab located just below the Portal Reco button. Here, you can filter invoices by matching status.
-
To update mismatched record, filter by Mismatch, click the Edit button, and update the record accordingly.
-
To add a document missing in books, filter by Missing in Books, click the Plus (+) button on the right side of the Portal document, and then click Save. The document will automatically be added to the books Data in Octa GST.